Creating the Android Project
Now that we have our idea let’s get the environment up and start coding.
To install Android follow the steps found on the official documentation page. I use eclipse so if you are a Java guy it should be pretty familiar. If you have never developed in Java but did some other coding in C++ or C# for example it should be pretty simple to catch up. I would recommend starting with some Java tutorials and then switch to Android. If you haven’t programmed before…well that’s though but it’s solvable. Google for some programming tutorials and don’t get discouraged! Then check back here.
I will use Android 2.2 as it is the latest at the time of this writing and I suspect it will take a long time till I finish this project so it just might be quite used. Also because we plan to use multi-touch we need version 2.x.
First let’s create the AVD (Android Virtual Device). Click on the little Android icon or choose Window -> Android SDK and AVD Manager and click on the New… button.
Set the name to MyDevice, the target to Android 2.2 – API Level 8. Set 128 MiB for the SD Card. Set the Skin to Built-in HVGA and the Hardware to Abstracted LCD density to 160. These are the current default settings.
The Android Virtual Device creation
Click Create AVD and the virtual device should be created.
Now let’s create the project.
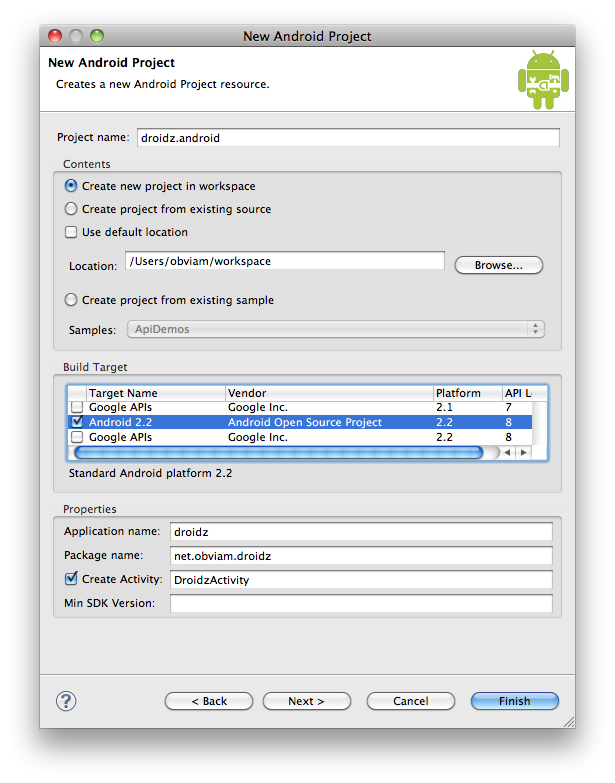
Select from the menu: New -> Project and choose Android Project.
Fill in as per the screen-shot and click Finish.
The Application name is the name given to our game. The package name is just the name space to group our classes.
Select Android 2.2 for Build Target.
The most important is the Create Activity. The Activity is the class instantiated when the application is started. Don’t have to worry about it right now just remember that is the first thing being called.
New Project Screen
In a nutshell the Activity handles our input (gets the touches on the screen),
creates the window where we will display our game and so on.
This usually is a full screen window and we will use one as such.
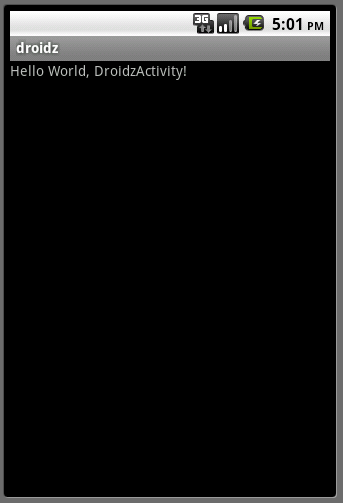
Let’s run the created application. Right click on the project and choose Run As -> Android Application. Choose the configured device and wait for it to load.
Remember not to close the Virtual Device once it has started as every time you will run your project, eclipse will redeploy it to the currently running device and will save you a lot of time if it’s already started.
You should see a screen like the one below. If the device asks you to unlock the screen do it by dragging the unlock button with your mouse.
Running the project
Now let’s examine what has just happened. Open the DroidzActivity.java file.
package net.obviam.droidz;


import android.app.Activity;

import android.os.Bundle;


public class DroidzActivity extends Activity {

  /** Called when the activity is first created. */

  @Override

  public void onCreate(Bundle savedInstanceState) {

    super.onCreate(savedInstanceState);

    setContentView(R.layout.main);

  }

}
You’ll notice one method. The onCreate() method on line 09. This method is called when the activity is being created at the application launch. It’s sets the view (the display) to be the default R (check R.java) which is the default resource view automatically generated by the android tools behind the scenes.
This file feeds on multiple configuration files to provide the activity with the view. It reads the main.xml from the res (which stands for resources) directory and parses it.
Let’s open the res/layout/main.xml file:
<?xml version="1.0" encoding="utf-8"?>

<LinearLayout xmlns:android="http://schemas.android.com/apk/res/android"

  android:orientation="vertical"

  android:layout_width="fill_parent"

  android:layout_height="fill_parent">

<TextView

  android:layout_width="fill_parent"

  android:layout_height="wrap_content"

  android:text="@string/hello"/>

</LinearLayout>
You’ll notice that a LinearLayout is used that fills up the whole screen and has a vertical positioning (Line 2). Line 3 tells that our orientation is horizontal while lines 4 and 5 instruct android to use the whole display (currently the parent is the display) for the view.
Line 7 defines a TextView which is just a label that takes up a whole line of the contained text’s height. The value is a placeholder read from the @string file. @string is also a placeholder for the strings.xml file and opening this file you’ll immediately notice that this is the place where the actually displayed value comes from. Worth noting that the R.java file is regenerated after we modify strigs.xml and for each resource entry a corresponding constant is generated and it will be used internally.
Open the /res/values/strings.xml file:
<?xml version="1.0" encoding="utf-8"?>

<resources>

  <string name="hello">Hello World, DroidzActivity!</string>

  <string name="app_name">droidz</string>

  <string name="warning">Robots are rising</string>

</resources>
These are the resource strings. Apart from line 5 which I added everything is generated. To add the warning message to the display just after the hello message modify the main.xml file and add a new TextView that will display our @warning message.
The new main.xml file looks like this:
<?xml version="1.0" encoding="utf-8"?>

<LinearLayout xmlns:android="http://schemas.android.com/apk/res/android"

  android:orientation="vertical"

  android:layout_width="fill_parent"

  android:layout_height="fill_parent">

  <TextView

    android:layout_width="fill_parent"

    android:layout_height="wrap_content"

    android:text="@string/hello"/>

  <TextView

    android:layout_width="fill_parent"

    android:layout_height="wrap_content"

    android:text="@string/warning"/>

</LinearLayout>
If you run the activity then you should have a screen displaying the new warning message too.
Worth noting that eclipse regenerated the R.java file and if you open it you will notice a similar line to this:
public static final int warning=0x7f040002;
It is generated by the android tooling and it keeps the IDs and pointers to the actual resources that are used in the activity.
Go ahead and play with the current setting and see what the options are for different display widgets.
Next we will actually load some images and draw them onto the screen.