A Basic Game Loop
Following the series so far you we have an understanding of the game architecture.
Even if just briefly but we know that we need to take input in some form, update the internal state of the game and finally render it to the screen and also produce some sounds and/or vibrations.
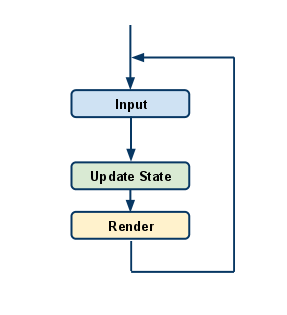
Let's keep it simple. Check the following diagram.
A Simple Game Loop
We handle input, update the state of our internal objects and render the current state.
The Update and Render are grouped logically. They are tied together and tend to be executed one after the other.
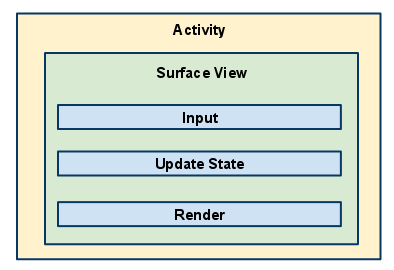
Anything in Android happens inside an Activity. The Activity will create a View. The View is where everything happens. It is where the touch takes place and the resulting image gets displayed. Think of the Activity as a table that holds a sheet of paper (the View) enabling us to draw something. We will use our pencil to draw something onto the paper. That will be our touch and the actual chemistry happens on the paper so the result of our interaction with the View produces an image. The same is with Activity and View. Something like the following diagram:
Android Game Loop
Let's open up DroidzActivity.java from our project. We see the line setContentView(R.layout.main);
This does nothing more than assigns the default (R) view to the activity when it is created. In our case it happens at startup.
Let's create a new View which we will use. A View is a simple class that provides us with event handling (like onTouch) and a visible rectangle shaped space to draw on. The simplest way is to extend Android's own SurfaceView. We will also implement SurfaceHolder.Callback to gain access to surface changes, for example when it is destroyed or the orientation of the device has changed.
MainGamePanel.java
package net.obviam.droidz;


import android.content.Context;

import android.graphics.Canvas;

import android.view.MotionEvent;

import android.view.SurfaceHolder;

import android.view.SurfaceView;


public class MainGamePanel extends SurfaceView implements SurfaceHolder.Callback {

    public MainGamePanel(Context context) {

        super(context);

        // adding the callback (this) to the surface holder to intercept events

        getHolder().addCallback(this);

        // make the GamePanel focusable so it can handle events

        setFocusable(true);

    }


    @Overridepublic

    void surfaceChanged(SurfaceHolder holder, int format, int width, int height) {

    }


    @Overridepublic

    void surfaceCreated(SurfaceHolder holder) {

    }


    @Overridepublic

    void surfaceDestroyed(SurfaceHolder holder) {

    }


    @Overridepublic

    boolean onTouchEvent(MotionEvent event) {

        return super.onTouchEvent(event);

    }


    @Overrideprotected

    void onDraw(Canvas canvas) {

    }

}
The above code is a plain class that overrides the methods we are interested in.
Nothing special apart from lines 15 and 17.
getHolder().addCallback(this);
This line sets the current class (MainGamePanel) as the handler for the events happening on the actual surface.
setFocusable(true);
The above line makes our Game Panel focusable, which means it can receive focus so it can handle events. We added the callback and made it focusable in the constructor so we won't miss.
The overridden methods (line 20 onwards) will all be used but currently keep them empty.
Let's create the thread that will be our actual game loop.
MainThread.java
package net.obviam.droidz;


public class MainThread extends Thread {

    // flag to hold game state

    private boolean running;


    public void setRunning(boolean running) {

        this.running = running;

    }


    @Override

    public void run() {

        while (running) {

            // update game state

            // render state to the screen

        }

    }

}
As you can see this does not do much. It overrides the run() method and while the running flag is set to true it does an infinite loop.
Currently the thread is not instantiated so let's start it up when the screen loads.
Let's take a look at the modified MainGamePanel class.
package net.obviam.droidz;


import android.content.Context;

import android.graphics.Canvas;

import android.view.MotionEvent;

import android.view.SurfaceHolder;

import android.view.SurfaceView;


public class MainGamePanel extends SurfaceView implementsSurfaceHolder.Callback {


    private MainThread thread;


    public MainGamePanel(Context context) {

        super(context);

        getHolder().addCallback(this);

        // create the game loop thread

        thread = new MainThread();

        setFocusable(true);

    }


    @Override

    public void surfaceChanged(SurfaceHolder holder,int format,int width,int height) { }


    @Override

    public void surfaceCreated(SurfaceHolder holder){

        thread.setRunning(true);

        thread.start();

    }


    @Override

    public void surfaceDestroyed(SurfaceHolder holder) {

        boolean retry = true;

        while(retry){

            try {

                thread.join();

                retry=false;

            } catch(InterruptedException e){

                // try again shutting down the thread

            }

        }

    }


    @Override

    public boolean onTouchEvent(MotionEvent event) {

        return super.onTouchEvent(event);

    }


    @Override

    protected void onDraw(Canvas canvas) {}

}
We added the following lines:
Line 12 declares the thread as a private attribute.
private MainThread thread;
In line 19 we instantiate the thread.
thread = new MainThread();
In the surfaceCreated method we set the running flag to true and we start up the thread (lines 30 and 31). By the time the this method is called the surface is already created and the game loop can be safely started.
Take a look at the surfaceDestroyed method.
public void surfaceDestroyed(SurfaceHolder holder) {

    // tell the thread to shut down and wait for it to finish

    // this is a clean shutdown

    boolean retry = true;

    while(retry) {

        try {

        thread.join();

        retry=false;

    } catch(InterruptedException e){ }

    // try again shutting down the thread

    }

}
This method is called directly before the surface is destroyed. It is not the place to set the running flag but the code we put in ensures that the thread shuts down cleanly. We simply block the thread and wait for it to die.
If we now run our project in the emulator won't be able to see much but we'll use some logging to test it. Don't worry about it as I will cover logging in a later chapter.
You can find more on the Android site.
Add interaction with the screen
We will exit the application when we touch the lower part of the screen. If we touch it anywhere else we'll just log the coordinates.
In the MainThread class we add the following lines:
private SurfaceHolder surfaceHolder;

private MainGamePanel gamePanel;

public MainThread(SurfaceHolder surfaceHolder, MainGamePanel gamePanel) {

    super();

    this.surfaceHolder = surfaceHolder;

    this.gamePanel = gamePanel;

}
We declared the gamePanel and surfaceHolder variables and a constructor taking the instances as parameters.
It is important to have them both and not just the gamePanel as we need to lock the surface when we draw and that can be done through the surfaceHolder only.
Change the line int the constructor of the MainGamePanel that instantiates the thread to
thread = new MainThread(getHolder(), this);
We are passing the current holder and the panel to its new constructor so the thread can access them. We will create the game update method in the game panel and we'll trigger it from the thread but currently just leave it as it is.
Add the TAG constant to the MainThread class. Every class will have its own String constant called TAG. The value of the constant will be the name of the class containing it. We are using Android's own logging framework and that takes two parameters. The firs is the tag which is just a string to identify the source of the log message and the second is the message we want to log. It's a good practice to use the name of the class for the tag as it makes it simple to look up the logs.
A note on logging
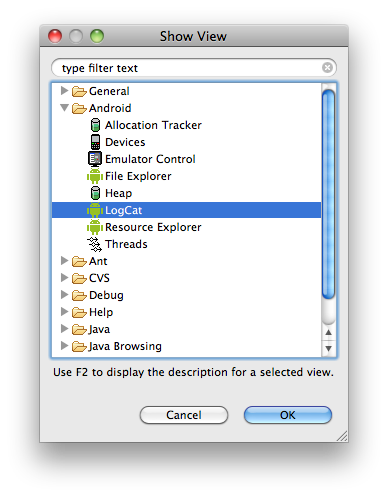
To open the log viewer go to Windows -> Show View -> Other... and in the dialog select Android -> LogCat
LogCat View
Now you should see the LogCat view. This is nothing more than a console where you can follow Android's log. It's a great tool as you can filter for logs containing a specific text or logs with a certain tag which is quite useful.
Let's get back to our code. The MainThread.java class looks like this:
package net.obviam.droidz;


import android.util.Log;

import android.view.SurfaceHolder;


public class MainThread extends Thread {

    private static final String TAG = MainThread.class.getSimpleName();

    private SurfaceHolder surfaceHolder;

    private MainGamePanel gamePanel;

    private boolean running;


    public void setRunning(boolean running) {

        this.running = running;

    }


    public MainThread(SurfaceHolder surfaceHolder, MainGamePanel gamePanel) {

        super();

        this.surfaceHolder = surfaceHolder;

        this.gamePanel = gamePanel;

    }


    @Override

    public void run() {

        long tickCount = 0L;

        Log.d(TAG, "Starting game loop");

        while (running) {

            tickCount++;

            // update game state

            // render state to the screen

        }

        Log.d(TAG, "Game loop executed " + tickCount + " times");

    }

}
In line 08 we define the tag for logging.
In the run() method we define tickCount which is incremented every time the while loop (the game loop) is executed.
We log the results.
Let's go back to MainGamePanel.java class where we modified the onTouchEvent method so we handle touches on the screen.
public boolean onTouchEvent(MotionEvent event) {

    if (event.getAction() == MotionEvent.ACTION_DOWN) {

        if (event.getY() > getHeight() - 50) {

            thread.setRunning(false);

            ((Activity)getContext()).finish();

        } else {

            Log.d(TAG, "Coords: x=" + event.getX() + ",y=" + event.getY());

        }

    }

    return super.onTouchEvent(event);

}
Line 02 we check if the event on the screen is a start of a pressed gesture (MotionEvent.ACTION_DOWN). If so we check if the touch happened in the lower part of the screen. That is, the Y coordinate of the gesture is in the lower 50 pixels of the screen. If so we set the thread's running status to false and call finish() on the main activity which basically exits the application.
Note: The screen is a rectangle with the upper left coordinates at (0,0) and the lower right coordinates at (getWidth(), getHeight()).
I have also modified the DroidzActivity.java class so we log its lifecycle.
package net.obviam.droidz;

import android.app.Activity;

import android.os.Bundle;

import android.util.Log;

import android.view.Window;

import android.view.WindowManager;

public class DroidzActivity extends Activity {

    /** Called when the activity is first created. */

    private static final String TAG = DroidzActivity.class.getSimpleName();

    @Override public void onCreate(Bundle savedInstanceState) {

        super.onCreate(savedInstanceState);

        // requesting to turn the title OFF

        requestWindowFeature(Window.FEATURE_NO_TITLE);

        // making it full screen

        getWindow().setFlags(WindowManager.LayoutParams.FLAG_FULLSCREEN, WindowManager.LayoutParams.FLAG_FULLSCREEN);

        // set our MainGamePanel as the View

        setContentView(new MainGamePanel(this));

        Log.d(TAG, "View added");

    }


    @Override protected void onDestroy() {

        Log.d(TAG, "Destroying...");

        super.onDestroy();

    }


    @Override

    protected void onStop() {

        Log.d(TAG, "Stopping...");

        super.onStop();

    }

}
Line 20 makes the display fullscreen.
The onDestroy() and onStop() methods were overridden just to log the activity's lifecycle.
Let's run the application by right-clicking on the project and select Run As -> Android application
You should see a black screen. If you click around a few time on the upper half and then you click on the bottom of your emulator's screen the application should exit.
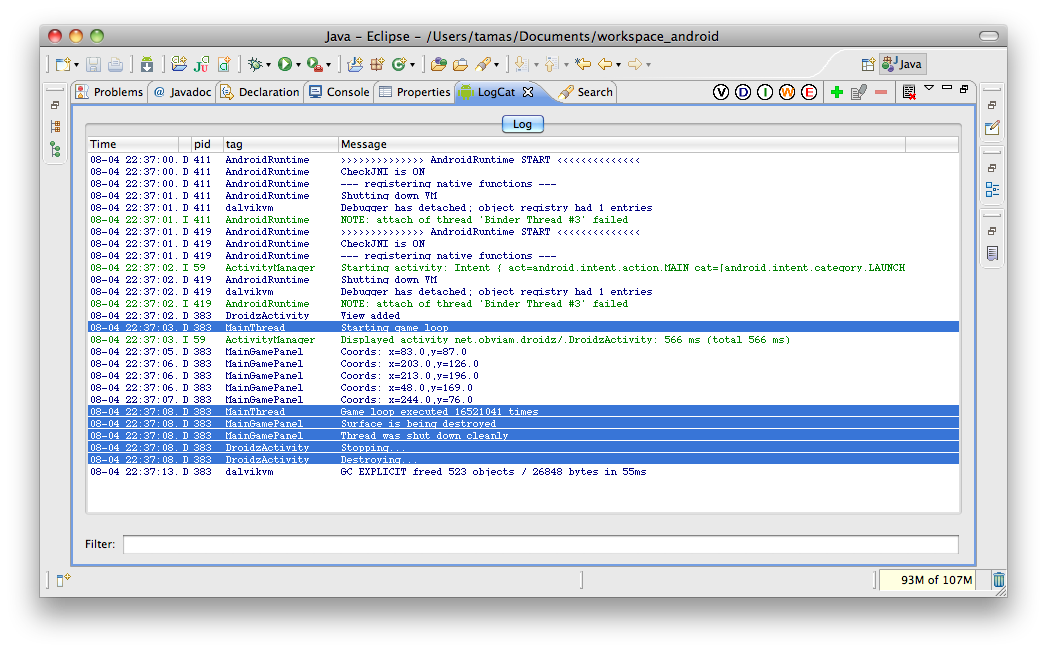
At this stage it is worth checking the logs.
LogCat
The highlighted lines are the most interesting as if you match look the logs up in the code you will see exactly the order of the method calls. You should also see how many times the thread's while loop executed. It is a very high number but next time we will be more considerate about the cycles as we will introduce FPS and UPS. That is Frames Per Second and Updates Per Second. We will create a game loop that will actually draw something onto the screen and it will do it as many times per second as we specify it.
Things we did so far:
-
Create a full screen application
-
Have a separate thread controlling the application
-
Intercepting basic gestures like pressed gesture
-
Shut down the application gracefully
Download the source code here.
Import it into eclipse and it should work right away.
How to implement a proper game loop with consideration for FPS and UPS can be found in [this article]
