
OpenGL ES Texture Mapping
In the previous two articles (article 1 and article 2) I have tried to introduce OpenGL ES on android. Now let’s take it further and build on them. In this article we will create a billboard (which is a square) and we will apply a texture onto it. A texture is nothing more than a bitmap image. When we work in 2D we set the Z coordinate to 0. We’ll cover 3D later. This is very useful to use in 2D games and is the preferred way to display images using OpenGL. It is very fast indeed.
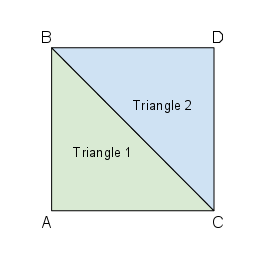
In the previous articles we managed to display triangles. How to display a square then? A square is composed of 2 triangles.
The following diagram shows you this:
Square from Triangles
There is an interesting thing to note here. The square is ABDC instead of the usual ABCD. Why is that? Because of how OpenGL chains triangles together.
What you see here is a triangle strip. A triangle strip is a series of connected triangles, 2 triangles in our case.
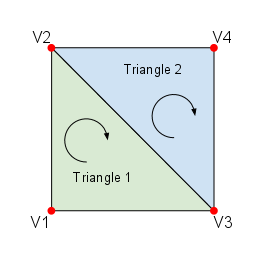
OpenGL draws the following triangle strip (which is a square) using the vertices in the following order:
Triangle 1: V1 -> V2 -> V3
Triangle 2: V3 -> V2 -> V4
Triangle Strip
It draws the first triangle using the vertices in order, then it takes the last vertex from the previous triangle and uses the last side of the triangle as the basis for the new triangle.
This also has benefits: we eliminate redundant data from the memory.
Grab the project from the previous article and create a new class called Square.
If you compare the Square class with the Triangle class, you will notice just one difference:
package net.obviam.opengl;


import java.nio.ByteBuffer;

import java.nio.ByteOrder;

import java.nio.FloatBuffer;


import javax.microedition.khronos.opengles.GL10;


public class Square {


    private FloatBuffer vertexBuffer;   // buffer holding the vertices


    private float vertices[] = {

            -1.0f, -1.0f,  0.0f,        // V1 - bottom left

            -1.0f,  1.0f,  0.0f,        // V2 - top left

             1.0f, -1.0f,  0.0f,        // V3 - bottom right

             1.0f,  1.0f,  0.0f         // V4 - top right

    };


    public Square() {

        // a float has 4 bytes so we allocate for each coordinate 4 bytes

        ByteBuffer vertexByteBuffer = ByteBuffer.allocateDirect(vertices.length * 4);

        vertexByteBuffer.order(ByteOrder.nativeOrder());


        // allocates the memory from the byte buffer

        vertexBuffer = vertexByteBuffer.asFloatBuffer();


        // fill the vertexBuffer with the vertices

        vertexBuffer.put(vertices);


        // set the cursor position to the beginning of the buffer

        vertexBuffer.position(0);

    }


    /** The draw method for the square with the GL context */

    public void draw(GL10 gl) {

        gl.glEnableClientState(GL10.GL_VERTEX_ARRAY);


        // set the colour for the square

        gl.glColor4f(0.0f, 1.0f, 0.0f, 0.5f);


        // Point to our vertex buffer

        gl.glVertexPointer(3, GL10.GL_FLOAT, 0, vertexBuffer);


        // Draw the vertices as triangle strip

        gl.glDrawArrays(GL10.GL_TRIANGLE_STRIP, 0, vertices.length / 3);


        //Disable the client state before leaving

        gl.glDisableClientState(GL10.GL_VERTEX_ARRAY);

    }

}
The difference is in the highlighted lines (13-18). That’s right, we’ve added one more vertex to the vertices array.
Now change the GlRenderer so instead of a Triangle we use a Square.
package net.obviam.opengl;


import javax.microedition.khronos.egl.EGLConfig;

import javax.microedition.khronos.opengles.GL10;


import android.opengl.GLU;

import android.opengl.GLSurfaceView.Renderer;


public class GlRenderer implements Renderer {


    private Square      square;     // the square


    /** Constructor to set the handed over context */

    public GlRenderer() {

        this.square     = new Square();

    }


    @Override

    public void onDrawFrame(GL10 gl) {

        // clear Screen and Depth Buffer

        gl.glClear(GL10.GL_COLOR_BUFFER_BIT | GL10.GL_DEPTH_BUFFER_BIT);


        // Reset the Modelview Matrix

        gl.glLoadIdentity();


        // Drawing

        gl.glTranslatef(0.0f, 0.0f, -5.0f);     // move 5 units INTO the screen

                                                // is the same as moving the camera 5 units away

        square.draw(gl);                        // Draw the triangle


    }


    @Override

    public void onSurfaceChanged(GL10 gl, int width, int height) {

        if(height == 0) {                       //Prevent A Divide By Zero By

            height = 1;                         //Making Height Equal One

        }


        gl.glViewport(0, 0, width, height);     //Reset The Current Viewport

        gl.glMatrixMode(GL10.GL_PROJECTION);    //Select The Projection Matrix

        gl.glLoadIdentity();                    //Reset The Projection Matrix


        //Calculate The Aspect Ratio Of The Window

        GLU.gluPerspective(gl, 45.0f, (float)width / (float)height, 0.1f, 100.0f);


        gl.glMatrixMode(GL10.GL_MODELVIEW);     //Select The Modelview Matrix

        gl.glLoadIdentity();                    //Reset The Modelview Matrix

    }


    @Override

    public void onSurfaceCreated(GL10 gl, EGLConfig config) {

    }

}
Running this will produce the following result:
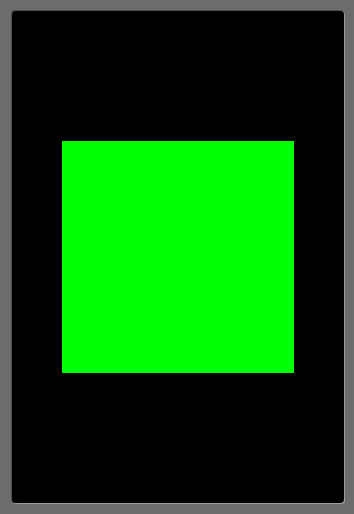
Triangle Strip forming a Square
Examining this, the draw() method in the Square class should make sense now.
public void draw(GL10 gl) {

    gl.glEnableClientState(GL10.GL_VERTEX_ARRAY);


    // set the colour for the square

    gl.glColor4f(0.0f, 1.0f, 0.0f, 0.5f);


    // Point to our vertex buffer

    gl.glVertexPointer(3, GL10.GL_FLOAT, 0, vertexBuffer);


    // Draw the vertices as triangle strip

    gl.glDrawArrays(GL10.GL_TRIANGLE_STRIP, 0, vertices.length / 3);


    //Disable the client state before leaving

    gl.glDisableClientState(GL10.GL_VERTEX_ARRAY);

}
First we enable OpenGL to use a vertex array for rendering. Our vertex array contains the vertices for our square.
gl.glVertexPointer (line 5) tells the opengl renderer from where to take the vertices and of what type they are.
The first parameter tells how many coordinates are used for a vertex. We use 3 (x,y,z). The second parameter tells that the values are of type float.
The 3rd parameter is the offset between the vertices in the array. It is called the strife. We have a tightly packed array so it is 0.
Finally the last parameter tells where the vertices are held. Of course it is our buffer vertexBuffer.
gl.glDrawArrays in line 11 tells OpenGL to draw the primitive. What kind of primitive? The one specified in the first parameter: GL10.GL_TRIANGLE_STRIP. It takes the vertices from the previously set vertex buffer and it follows the rules of the triangle strips described earlier.
The second parameter specifies the starting index for the vertices in the array.
The 3rd parameter tells OpenGL, how many vertices to use for the polygon, about to be rendered. Because in the previous statement (gl.glVertexPointer) we specified that 3 coordinates define a vertex, we will provide the length of our vertex array divided by 3. There are 9 elements in the array defining 3 vertices.
glDisableClientState(GL10.GL_VERTEX_ARRAY) disables the state of rendering from an array containing the vertices.
Think of glEnableClientState and glDisableClientState as begin … end statements in a program. We basically enter subroutines in the OpenGL renderer. Once we entered a routine, we set up variables (the vertex buffer, the colour, etc) and we execute other subroutines (draw vertices). After we’re done, we exit the subroutine. We work in isolation inside the renderer.
Make sure you run the application at this stage and understand what is going on.
Creating the Texture
Now the fun part. Let’s load up an image and create a texture. A texture IS an image.
To find out how you can load up images in your android app, check out this article.
We will be working with the Square class as we want to apply the texture to the square.
We need to load up the image, tell the opengl renderer that we want to use it as a texture, and finally we will tell the renderer where exactly onto our primitive (square) to display it.
Think of it as if you were putting a foil onto a window or a wall. I provide you with a foil containing an image of the size of the window and tell you to cover the window with it, so the top left corner of the foil will be on the top left corner of the window. That is it, let’s get to work.
OpenGL uses the vertices to work out where to put stuff. So we need to create an array for the image. But this time, this will be 2D as a bitmap is like a sheet of paper, a flat plane.
Add the coordinate array for the texture.
private FloatBuffer textureBuffer;  // buffer holding the texture coordinates

private float texture[] = {

    // Mapping coordinates for the vertices

    0.0f, 1.0f,     // top left     (V2)

    0.0f, 0.0f,     // bottom left  (V1)

    1.0f, 1.0f,     // top right    (V4)

    1.0f, 0.0f      // bottom right (V3)

};
We need to create the textureBuffer in a similar way to the vertexBuffer. This happens in the constructor and we’ll just reuse the byteBuffer. Check the new constructor:
public Square() {

    ByteBuffer byteBuffer = ByteBuffer.allocateDirect(vertices.length * 4);

    byteBuffer.order(ByteOrder.nativeOrder());

    vertexBuffer = byteBuffer.asFloatBuffer();

    vertexBuffer.put(vertices);

    vertexBuffer.position(0);


    byteBuffer = ByteBuffer.allocateDirect(texture.length * 4);

    byteBuffer.order(ByteOrder.nativeOrder());

    textureBuffer = byteBuffer.asFloatBuffer();

    textureBuffer.put(texture);

    textureBuffer.position(0);

}
We will add an important method to the Square class. The loadGLTexture method. This will be called from the renderer when it starts up. It happens in the onSurfaceCreated method. This will load up the image from the disk and bind it to a texture in the OpenGL repository. It will basically assign an internal ID for the processed image and will be used by the OpenGL API to identify it among other textures.
/** The texture pointer */

private int[] textures = new int[1];


public void loadGLTexture(GL10 gl, Context context) {

    // loading texture

    Bitmap bitmap = BitmapFactory.decodeResource(context.getResources(),

            R.drawable.android);


    // generate one texture pointer

    gl.glGenTextures(1, textures, 0);

    // ...and bind it to our array

    gl.glBindTexture(GL10.GL_TEXTURE_2D, textures[0]);


    // create nearest filtered texture

    gl.glTexParameterf(GL10.GL_TEXTURE_2D, GL10.GL_TEXTURE_MIN_FILTER, GL10.GL_NEAREST);

    gl.glTexParameterf(GL10.GL_TEXTURE_2D, GL10.GL_TEXTURE_MAG_FILTER, GL10.GL_LINEAR);


    // Use Android GLUtils to specify a two-dimensional texture image from our bitmap

    GLUtils.texImage2D(GL10.GL_TEXTURE_2D, 0, bitmap, 0);


    // Clean up

    bitmap.recycle();

}
We need a texture pointer array. This is where OpenGL will store the names of the textures we will use in our application. Because we have just one image, we will create an array of size 1.
Line 06 loads the android bitmap which was previously copied into the /res/drawable-mdpi directory, so the ID is already generated.
A note about this bitmap. It is encouraged to be square. It helps a lot with scaling. So make sure your bitmaps for textures are squares (6×6, 12×12, 128×128, etc.). If not square, make sure the width and height are powers of 2 (2, 4, 8, 16, 32, …). You can have a bitmap 128×512 and it is perfectly usable and it is optimised.
Line 10 generates the names for the textures. In our case generates one name and stores it in the textures array. Even if it says name, it actually generates an int. A bit confusing, but it is how it is.
Line 12 binds the texture with the newly generated name (texture[0]). What this means is, that anything using textures in this subroutine, will use the bound texture. It practically activates the texture. A bound texture is the active texture. If we would have had multiple textures and multiple squares to use them, we would have had to bind (activate) the appropriate textures for each square just before they were used to activate them.
Lines 15 and 16 set some filters to be used with for texture. We have just told OpenGL what types of filters to use when it needs to shrink or expand the texture to cover the square. We have chosen some basic algorithms on how to scale the image. Don’t have to worry about this now.
In line 19 we use Android’s utilities to specify the 2D texture image for our bitmap. It creates the image (texture) internally in its native format based on our bitmap.
in line 22 we free up the memory. This you should not forget as memory on a device is very limited and images are big.
Now let’s see how the draw() method has been modified.
public void draw(GL10 gl) {

    // bind the previously generated texture

    gl.glBindTexture(GL10.GL_TEXTURE_2D, textures[0]);


    // Point to our buffers

    gl.glEnableClientState(GL10.GL_VERTEX_ARRAY);

    gl.glEnableClientState(GL10.GL_TEXTURE_COORD_ARRAY);


    // Set the face rotation

    gl.glFrontFace(GL10.GL_CW);


    // Point to our vertex buffer

    gl.glVertexPointer(3, GL10.GL_FLOAT, 0, vertexBuffer);

    gl.glTexCoordPointer(2, GL10.GL_FLOAT, 0, textureBuffer);


    // Draw the vertices as triangle strip

    gl.glDrawArrays(GL10.GL_TRIANGLE_STRIP, 0, vertices.length / 3);


    //Disable the client state before leaving

    gl.glDisableClientState(GL10.GL_VERTEX_ARRAY);

    gl.glDisableClientState(GL10.GL_TEXTURE_COORD_ARRAY);

}
It’s not a huge modification from the previous article. The additions are documented and do the following:
Line 03 binds (activates) the texture with the name (integer ID) stored in textures[0].
Line 07 enables the texture mapping in the current OpenGL context.
Line 14 provides the OpenGL context with the texture coordinates.
After drawing the primitive with textures, we switch off the texture mapping along with the primitive rendering.
UV Mapping
If you look carefully, the vertex order in the texture mapping coordinates array doesn’t follow the order present in the square’s vertex coordinates array.
Examine the following diagram.
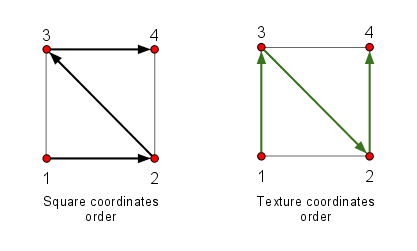
Square and Texture Coordinates Ordering
The square is composed of 2 triangles and the vertices are in the following order.
1 – bottom left
2 – bottom right
3 – top left
4 – top right
Notice the counter clockwise path.
The texture coordinates will be in the order: 1 -> 3 -> 2 -> 4
Just bear this mapping in mind and rotate it if you start your shape from a different corner. To read up on UV mapping check the wikipedia entry or search the net for it.
For the final part, to make this work, we need to provide the context to our renderer so we can load up the texture at startup.
The onSurfaceCreated method will look like this.
public void onSurfaceCreated(GL10 gl, EGLConfig config) {

    // Load the texture for the square

    square.loadGLTexture(gl, this.context);


    gl.glEnable(GL10.GL_TEXTURE_2D);            //Enable Texture Mapping ( NEW )

    gl.glShadeModel(GL10.GL_SMOOTH);            //Enable Smooth Shading

    gl.glClearColor(0.0f, 0.0f, 0.0f, 0.5f);    //Black Background

    gl.glClearDepthf(1.0f);                     //Depth Buffer Setup

    gl.glEnable(GL10.GL_DEPTH_TEST);            //Enables Depth Testing

    gl.glDepthFunc(GL10.GL_LEQUAL);             //The Type Of Depth Testing To Do


    //Really Nice Perspective Calculations

    gl.glHint(GL10.GL_PERSPECTIVE_CORRECTION_HINT, GL10.GL_NICEST);

}
Line 03 loads the texture. The rest of the lines just configure the renderer with some values. You don’t have to worry about them now.
You will need to provide the application context to the Square object, because the object itself loads the texture and needs to know the path to the bitmap.
Just provide the context to the renderer in the Run activity’s onCreate method (glSurfaceView.setRenderer(new GlRenderer(this));) and it’s done.
Make sure the renderer has the context declared and set via the constructor.
Excerpt from the GlRendered class.
private Square      square;     // the square

private Context     context;


/** Constructor to set the handed over context */

public GlRenderer(Context context) {

    this.context = context;


    // initialise the square

    this.square = new Square();

}
If you run the code you should see the square with a nice android laid on top of it.

Square with Android Texture
Download the source code and project here (TBD).